This article is more than 1 year old
Giving some Juce to cross-platform tools
Juce in the spotlight
Pressing some Juce...
As I mentioned earlier, the entire source tree of Juce is available for download. Rather than splitting the class library up into separate packages for each platform, the corresponding makefiles (or equivalent) are included within the tree. Below the /juce/build directory, you'll find individual subdirectories for Linux, OS X and Win32. The Linux directory contains a standard makefile and the build is compatible with GCC 3.3 onwards. The OS X subfolder contains a project file for Apple's XCode IDE, and under Windows there are separate solution files for Visual C++ 6.0 and 8.0 (a.k.a. Visual C++ 2005).
In practice, Visual C++ 2005 didn't seem to like the provided solution file. Taking a hint from the very active discussion forum, I switched over to Visual C++ 2005 Express Edition, and everything was fine from then on. In addition, the consensus seems to be that things will go a lot more smoothly if you avoid DLL builds on the Win32 platform. No surprises there then...
The number of platform-specific source files is small and localised within the source tree – just as it should be. The Win32 code is obviously sitting on top of the "barefoot" Win32 API, while the Linux-specific routines map down to X. On the Mac, the windowing system is implemented via Carbon. The bottom line in all three cases is that no additional runtime support is required by Juce applications. Again, just as it should be.
Once you peruse the demo program and library source code, you'll realise just how juicy Juce is! In addition to all the usual user interface widgets such as buttons, sliders, tabbed dialogs, list-boxes, tree-views, and so on, Juce also has built in support for multi-threading, XML parsing, OpenGL rendering, graphics paths, transparency, transforms, drag and drop support, and can even render PNG, JPG, SVG graphics, etc. You get file open/save dialogs (though you can use the native ones if preferred), directory browsers and a colour selector dialog. Heck – you can even have animated menu items...if you must!
What impresses me as much as anything is the elegance and conciseness with which even complex effects can be achieved. As an example, here's an abbreviated source snippet from the demo program. This code draws four star-shaped buttons on a form and sets them up as radio-buttons – see the "radio buttons" page in the Widgets section of the demo. And no, I'm not actually advocating the use of star-shaped radio buttons!
for (i = 0; i < 4; ++i)

  {
   DrawablePath normal, over;

   Path p;
   p.addStar (0.0f, 0.0f, i + 5, 20.0f, 50.0f, -0.2f);
   normal.setPath (p);
   normal.setSolidFill (Colours::lightblue);
   normal.setOutline (4.0f, Colours::black);

   over.setPath (p);
   over.setSolidFill (Colours::blue);
   over.setOutline (4.0f, Colours::black);

    DrawableButton* db = new DrawableButton (String (i + 5) + T(" points"),
 DrawableButton::ImageAboveTextLabel);
  db->setImages (&normal, &over, 0);

  page->addAndMakeVisible (db);
  db->setClickingTogglesState (true);
  db->setRadioGroupId (23456);

  const int buttonSize = 50;
  db->setBounds (25 + i * buttonSize, 180, buttonSize, buttonSize);

  if (i == 0) db->setToggleState (true, false);
}
For each iteration of the loop, the code creates a new Path component (a type of graphics path) and adds a star shape to it. The third parameter to addStar controls the number of points giving us five, six, seven and eight-pointed stars. You can think of a Path as a collection of shape outlines, but to do anything useful, we need to render it.
Thus, the path is copied into normal, an instance of DrawablePath class which (in Win32 API terms) brings a pen and brush to the party. The setSolidFill and setOutline methods do what they say on the tin, defining the inner fill colour and the colour and thickness of the pen used to render the shape. In exactly the same way, we create another DrawablePath, over, which is identical except for a darker blue interior.
A DrawableButton gets created next, specifying a caption (notice the slick String class which, through the magic of operator overloading, gives us some nice syntactic candy) and telling the button that the image should be above the text label. The call to setImages allows up to three separate images to be assigned to the button: normal, mouse-over, and mouse-down. In this case, the mouse-down case hasn't been used. What's clever here is that setImages expects a set of Drawable arguments, Drawable being the ancestor class of DrawablePath. In the same way, you could provide instances of DrawableText, DrawableImage or DrawableComposite. The latter is a container class, itself a descendant of Drawable which contains an arbitrary number of other Drawable instances. This is a good illustration of the flexibility that Julian has built into the library.
Finally, the code adds the button to the current demo page, makes it visible, specifies that clicking the button toggles the state and – here's another clever bit – assigns all four buttons to the same radio group. This causes them to act in concert as a radio button group, even though we're not actually dealing with radio buttons per se.
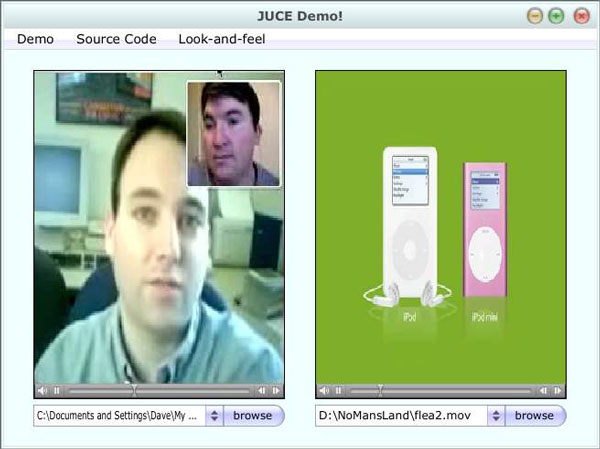
Figure 2 shows that not only does Juce support the playback of Quicktime movies but it'll also play two at the same time. You obviously need to have Quicktime installed on a Windows system for this to work.

