This article is more than 1 year old
You DON'T need a new MacBook! Reg man fiddles with Fusion, pimps out vintage Pro
Old school Unibody upgrading with Mavericks and storage tricks...
Feature I need a new MacBook Pro… or do I? It’s probably a question that many a Mac user ponders and, given the choices these days, is much more difficult to answer. Having just reviewed the MacBook Pro 13in with Retina Display, I’m not sure I’m ready to commit myself to soldered RAM and the hope that upgrades will appear for its custom SSD form factor.
For me, it seems like I’m going to have to eke out another year on my Unibody 17in MacBook Pro. At least that way I can hope the passing of time will lower the cost for a decent amount of RAM and a sizeable SSD. And who knows, I might be a Chromebook convert by then.

Optical collusion: DVD drive death is a dual drive opportunity
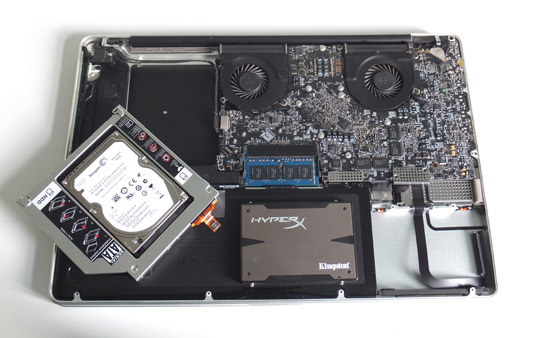
Sadly, the optical drive failed in my MacBook behemoth a while ago, but rather than bemoan its passing, I saw it as an opportunity: let’s have two drives in the beastie – one SSD, one HDD. That’ll sort out the my-SSD-isn’t-big-enough problems and regular offloading of content to an external drive.
With that idea in mind, yet another idea presented itself: a Fusion drive. A hybrid of SSD and HDD tech that, through some clever housekeeping, keeps the regularly accessed files on the SSD and shifts the rest to the HDD. That way, the SSD delivers the performance and doesn’t get filled with detritus and voluminous content.
Meanwhile the more capacious HDD does the heavy lifting, so various music, movie and photo libraries can linger on there along with lesser used apps and system files. The whole arrangement is seamless as you only see one drive on the desktop with the total capacity of the two drives showing as available.
The Macs factor
Apple offers Fusion drives on its iMac and Mac Mini computers, which to most appeared to be the end of the matter. However, last year Cocoa developer Patrick Stein – aka tech blogger JollyJinx outlined how a Fusion drive is created with a few nifty command line keystrokes - and, in the process, revealed that older Macs could be also be configured with one.
Now, that was all running under Mountain Lion, which had me wondering a few things. How easy would it be to rip out the optical drive and replace it with an HDD? Would it successfully marry up with with an SSD to become a Fusion drive and could I do a clean install of Mavericks in the process, all on my MacBook Pro 17in with its Intel 2.93GHz Core 2 Duo T9800 CPU and 8GB RAM?
More to the point, if all went well, just how would the end result perform? This Mac is no spring chicken but with an SSD installed it doesn’t struggle at all with everyday tasks. It also has the full HD anti-glare screen and has done the business as a desktop replacement without serious complaint since I bought it new as a BTO option.

Mavericks downloads to the Applications folder – a curious date, unless you know your Mac history
One other thing is that it will also run Mac OS X 10.6, the last system to support PowerPC software courtesy of translation app, Rosetta. Apple says you can partition a Fusion drive and maybe I could get Snow Leopard on this configuration too and maintain a link with legacy apps. Maybe.
First things first though and I need Mavericks, aka Mac OS X 10.9. The good news is it’s free if you’re running Snow Leopard (10.6), Lion (10.7) or Mountain Lion (10.8). The bad news is that, being a download, you can’t simply boot your Mac from a DVD to do a clean install. One way around it is to create a bootable USB stick.
There are various methods discussed on-line that involve a bit of terminal nerdiness but by far the simplest approach is to use DiskMakerX – a free app which can create a DVD, HDD or a USB installer drive. The way it does all this is to repurpose the Mavericks installer app. The catch being that if you run the Mavericks installer to upgrade your own system, it self-deletes afterwards.

DiskmakerX application allows you to choose an OS X installer from those downloaded
So you’ve got to plan this out properly and although I’ve seen it suggested that simply copying the installer elsewhere first to use later will suffice, I didn’t have any success with this approach. For some reason the end result wouldn’t boot. What did work was to download Mavericks, leave it in situ in the Applications folder and then let DiskMakerX work its magic.
I think part of the problem was that I was booting the Mac from an external USB enclosure that contained a full working Mac OS X installation on a 30GB SSD that I use for diagnostics. I’d downloaded Mavericks onto this drive but as it wasn’t the resident SATA drive, putting together a bootable USB installer from this set-up didn’t play nice.
